So, you think you’re ready to start a big end of the year fun STEM activity (engineering design process) project with your students. One that will take need lots of materials and time. And maybe a lot of mess.
Did you get that anxious feeling in the pit of your stomach when I said that? Don't worry. It's entirely natural to feel apprehensive when you undertake a big, somewhat messy project with your students. I know I did when I implemented this project last summer.
I’ve been teaching at a summer enrichment program every summer since 2017. A few years ago, I made the swap from elementary to middle school and from PK-8 American Sign Language as an afternoon special to PK-8 STEAM. And let me tell you, I felt both excitement and overwhelm.
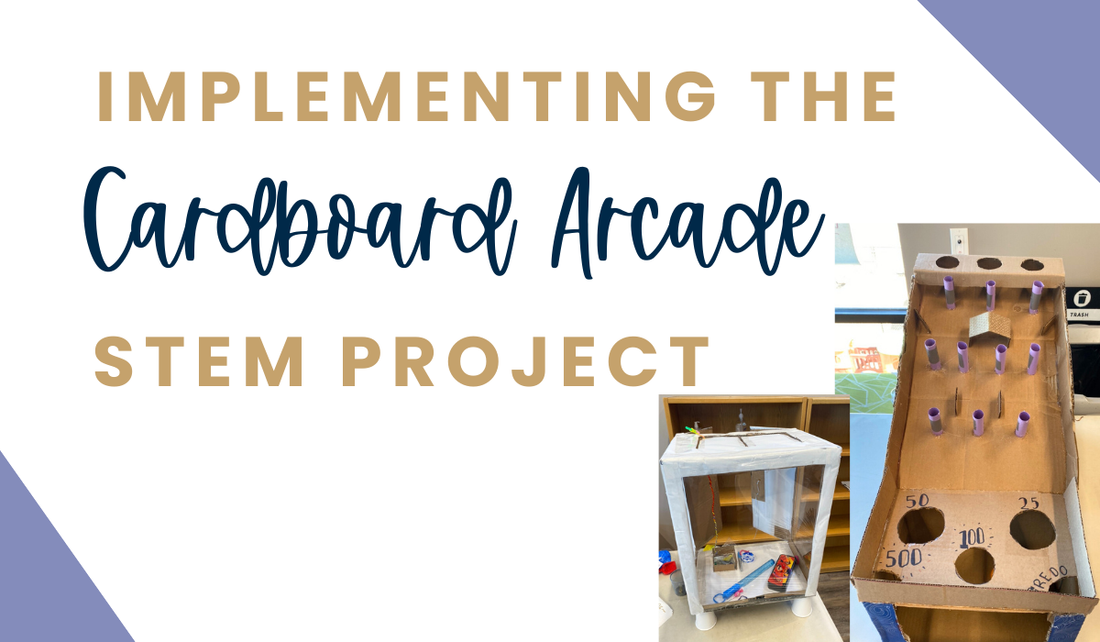
Last spring, I saw the “Caine’s Arcade” YouTube documentary (also linked here) and just knew that it would be the perfect summer STEM project for my students to complete.
However, before you implement the cardboard arcade game STEM project in your elementary or middle school classroom, you should make sure you've done the following things before you get started with your students.
By the end of this post, that nervous feeling will be long gone and you’ll be so excited to do this with your students!
#1. Make sure you send a letter (or email) home!
This one will seem like a no-brainer, but you’d be surprised at how many teachers assume families don’t want to help.
This one involves a little bit of planning ahead - knowing when your current unit will be finished, and when you will be starting the arcade game project with your students. Knowing when you will start the arcade project will help you know how far in advance to send your letter (or email) home so that you have the time you need to collect all the supplies.
In the email I sent to families a few weeks before the summer program began, I explained what this project was and what their child would be working on in STEAM. I discussed what traits we would be working on throughout our summer together and included a list of supplies that were needed for our project if parents or guardians were able and willing to donate anything.
We had LOTS of families bring in cardboard boxes and this helped me out a ton! In my second point, I’ll share a bit more about how I got even more cardboard boxes for my students.
Because you need a LOT of supplies for this project, it is imperative to send a letter to families. Don’t waste your time figuring out how to gather all the supplies on your own and make sure you send this letter, email, or both home. Families might donate, or they might not - but you will never know unless you try!
To recap what I included in my email:
-
Explained the project and what their child would be working on
-
Character traits we’d be focusing on while we worked on this project
-
List of supplies we needed if parents/guardians were able and willing to donate
#2. Collect alllllllll the cardboard
The second step I started to do (in conjunction with planning out my actual unit) was to collect as much cardboard as possible. I had roughly 55 students participating, and that is a high amount of cardboard that needed to be collected. For those who are not using this as a summer project, you will most likely have more than 55 students (which equals a lot more cardboard).
There were two things that I did to collect all the boxes we needed that summer.
Parent Letter Home
The first thing I did in my search for cardboard was send a parent letter home (discussed in more detail in Point #1 above). Many of my students’ families brought in cardboard boxes of all sizes, which helped us immensely with this project and saved so much time on my end. I did wish we had at least one big box for each team to use, but the medium-sized boxes worked fine.
Costco (or Sam’s Club)
Here in the Pacific Northwest, we have Costco and I love it. I would make trips a few mornings a week to collect cardboard and put it into my stockpile in our makeshift STEAM room.
I found that mornings were the best time to go since they had the best cardboard selections at that time. I would ask an employee if they had cardboard boxes and tell them I needed it for a big project with my summer school students. They would usually direct me to the place in the store where they had discarded boxes and I could take as many as I wanted. My director also stopped by Costco once a week to pick up breakfast items for all the students and would get some extra boxes for me then too.
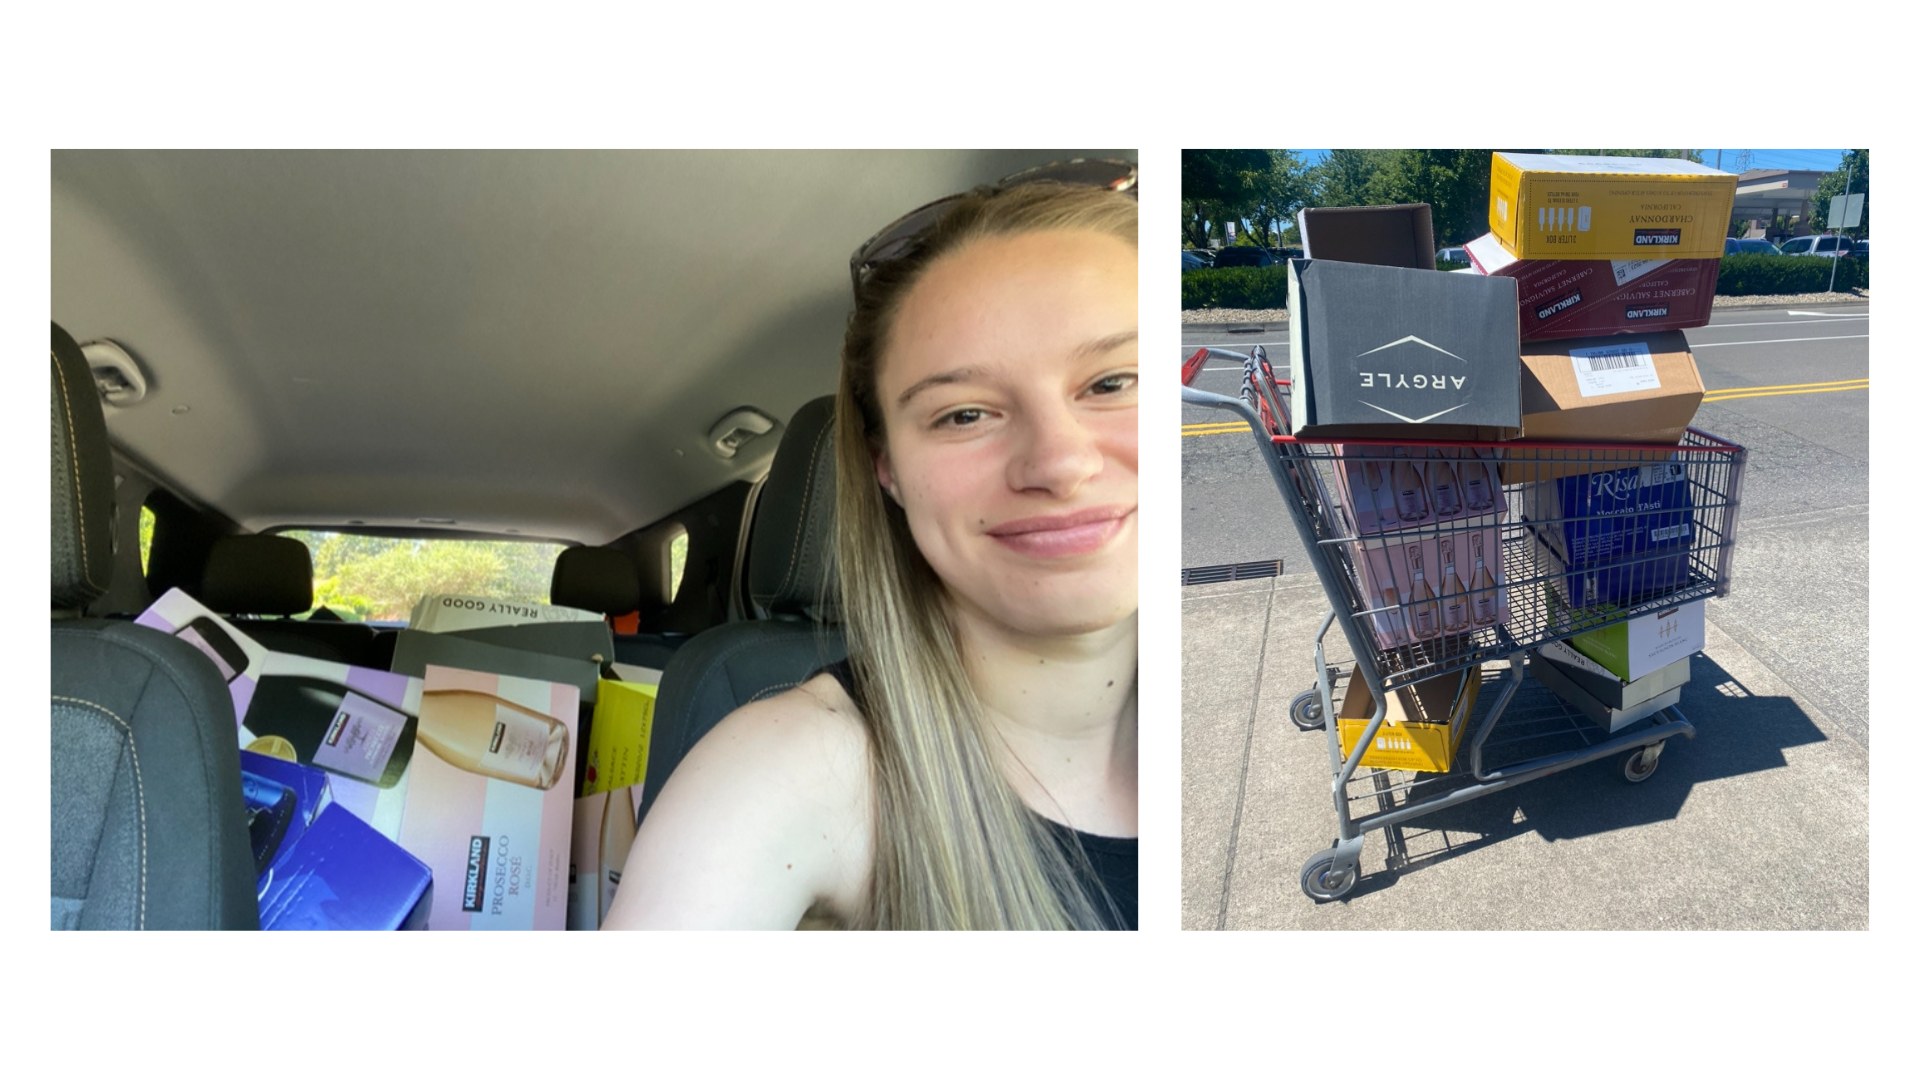
I made so many trips to Costco last summer - thought it was funny that all the boxes they gave me were wine boxes.
If you don’t have a Costco where you live, Sam’s Club or other big grocery stores like Winco or Fred Meyer (possibly even Target) could work. It can never hurt to ask! The biggest part of the prep work for this project is getting creative with where/how you get the supplies and then collecting them.
#3. Plan out your unit
You’ll need to determine what grade levels you want to use this STEM project for (and what standards will best connect). The students that I teach are mostly average to advanced, and whose parents want them to continue to be engaged in the learning process throughout the summer.
Grade Levels
I wanted to find a project that almost all of my students could do. I figured out quickly that Pre-K, Kindergarten, and 1st grade would struggle so I pivoted with this class and did some small, fun STEM challenges and play instead (they loved connector straws and kinetic sand).
My second graders became thoroughly invested in this project after watching the “Caine’s Arcade” documentary and couldn’t wait to come to STEAM class every session to work on their games. My 3rd, 4th, 5th, and 6-8th grade classes were also very engaged throughout the process, and every grade in between, which made this project a winner in my book.
Standards
I have a lot more freedom and flexibility in how I teach over the summer, so while I try my best to incorporate standards into my unit plans, I am not married to them. When I initially began planning out this project last May, I mostly focused on the engineering design process.
For teachers who are looking to incorporate certain standards in either math or science, the Next Generation Science Standards are a great resource to look into (they have paired very well with this project).
The 6-8th grade standard adds onto what the 3-5th graders focus on by adding relevant scientific principles and potential impacts on people and the natural environment that might limit possible solutions.
I am a huge proponent of collaboration and integrated learning, and this project gives the perfect opportunity for middle school math and science teachers to team up to implement this project.
I also love that the Next Gen standards incorporate relevant math and literacy standards so you can easily crosscut between multiple subjects.
Here are some topics to consider if you are incorporating this project into 6-8th grades:
-
Science Concepts - what have students been learning about in science this year that can be connected to a cardboard arcade?
-
Recyclable vs. Non-Recyclable Materials
-
Simple Machines
-
Physics concepts
-
Math Concepts - what have students been learning about in math this year that can be connected to an arcade?
-
Geometry
-
Measurement
-
Estimation
If you are looking to tie additional math concepts in with this project as an end-of-year review, area and perimeter, volume, and budgeting (financial literacy) are all great options!
#4. Engineering Design Process
I debated combining the engineering design process in with my point about planning (#3). There was a lot that I wanted to share in regard to the engineering design process though, so I decided to make it its own point.
Because this was a summer program and not part of a year-long curriculum, I created an “Introduction to STEM” lesson that introduced students to the steps of the engineering design process and gave them a mini-challenge with connector straws.
You will most likely have more time with your students than the amount of time I had or have already covered this.
The Engineering Design Process covers the following steps:
-
Define the Problem
-
Background Research
-
Determine Design Specifics & Constraints
-
Design Statement
-
Design a Prototype
-
Construct a Prototype
-
Test the Prototype
-
Evaluate
Define the Problem
This is where students will determine the problem (maybe they have to create a cardboard arcade game for X company with X requirements).
Background Research
Students will conduct research to understand their problem better and identify possible solutions. They will most likely need Chromebooks or iPads for this portion of the unit.
Determine Design Specifics and Constraints
-
What are the dimensions of the designs?
-
What materials are needed?
-
What will affect their game (amount of time to work on it, materials provided, or cost)?
Design Statement
I provided sentence frames and had my students write down the type of game they were planning to create, the objective, special features, and what materials they needed to build their game.
Design a Prototype
Students worked in their teams to create a prototype, or blueprint, of their game. I had them be as specific as possible (dimensions, materials, etc.).
Construct a Prototype
When we got to the build process, students were ready! They had a carefully crafted blueprint and knew exactly what they were going to do and what they needed to construct their game. We spent a handful of days on this part of the process.
Test the Prototype & Evaluate
Students had time to test their games by playing them, and write down what worked and what didn’t work. They then regrouped with their team to brainstorm more solutions for the things that didn’t work, and then adjust their game and re-test if needed.
#5. Utilize the Points Challenge
If you’re looking for an extra challenge for your students and want to incorporate some financial literacy, utilize the “points challenge”. From my experience, I had a lot of very clever middle schoolers who always tried to find a workaround for the requirements. You will need to be very clear upfront about what materials students can and cannot use on their games so there is no room for workarounds (for example, you share a list of provided and approved materials that students can use in their games - anything else not on the list is not allowed).
Assign a set number of points for each item on the materials list, and a number of points students have as their “budget” to work with. For example, each student/group gets a certain-sized box and 300 points for other materials. Let’s say that students want to laminate something, and each laminating sheet costs 5 points. If they laminate 4 sheets, they’re now down 20 points.
This encourages students to use their resources wisely AND to have a solid plan in place before they work on building their games. I did not use that this summer, but when I use this project again in the future, I do plan to utilize the points challenge.
#6. Consider how your students will be grouped
My second-to-last item to consider is how you will group your students for this project. Will they have the option to work alone? With a partner? With a small group? Will they choose their teams, or will you decide?
When I used this project in my classroom, I let my students pick the classmates they wanted to work with (no more than 3 to a team). My students were extremely responsible and I never had any problems regarding behavior with them, so I was able to trust them to work well with their friends and wanted to give them the opportunity. Other classes I teach during the year, not so much.
If you are hesitant, consider using a free random group generator and adjust the teams as needed (I love using this one when I make my seating charts).
#7. Say “No” to the Ticket System (and Prizes)
The bane of my existence when I used this last summer was that my younger students (2-4th) became much more focused on creating “tickets” and prizes rather than the actual process of creating the games and enjoying playing them afterward.
What I should have done (but was not even thinking about) in the beginning was tell students upfront that there would be no tickets or prizes in our arcade.
This part was a total nightmare, so I hope you learn from my experience!
#8. Determine where games will be set up and when classes can visit
The last thing that you will want to consider is where your students will set up their games at the end of the unit for other classes to stop by to see them and play (and when). I recommend having an adult supervising at all times so that games do not get destroyed (accidentally or intentionally) by other students, and setting up specific times for each class to visit the arcade.
Our gym was not available to us to use, so we had our kids set them up in an upstairs area in the church. We created a sign that said “Summer School Program Arcade” and arrows pointing up the stairs.
We designated a section of the space to our 2-3 grade games, another section to our 4-5th graders, and a final section for our 6-8th graders to display their games. Our students enjoyed going upstairs at their class’s scheduled time to play the games and had a blast.
There you have it!
Check, check, and check!
Thank you for trusting me to take you through my checklist of things to do before using the fun cardboard arcade summer STEM project with your students!
Do you feel better now that you know what things you need to get done and how far you've already come?
If you still have questions about how to implement this project, know that I'm always one email [lauren@thebackupteacher.com] or Instagram DM [@thebackupteacher] away.
Here for you,
Lauren
PS. If you’d like to get started, here’s an awesome resource with everything I used to implement the arcade project. You can check it out here!